
Food Log Overview
The Food Log is the core of the Macro Chief app. On the surface, its premise is straightforward: log your meals throughout the day, and the app tracks your nutrient intake, aligning it with your personalized targets. Yet, beneath this simplicity lies a myriad of features designed to streamline your logging experience, ensuring it is as effortless as possible.
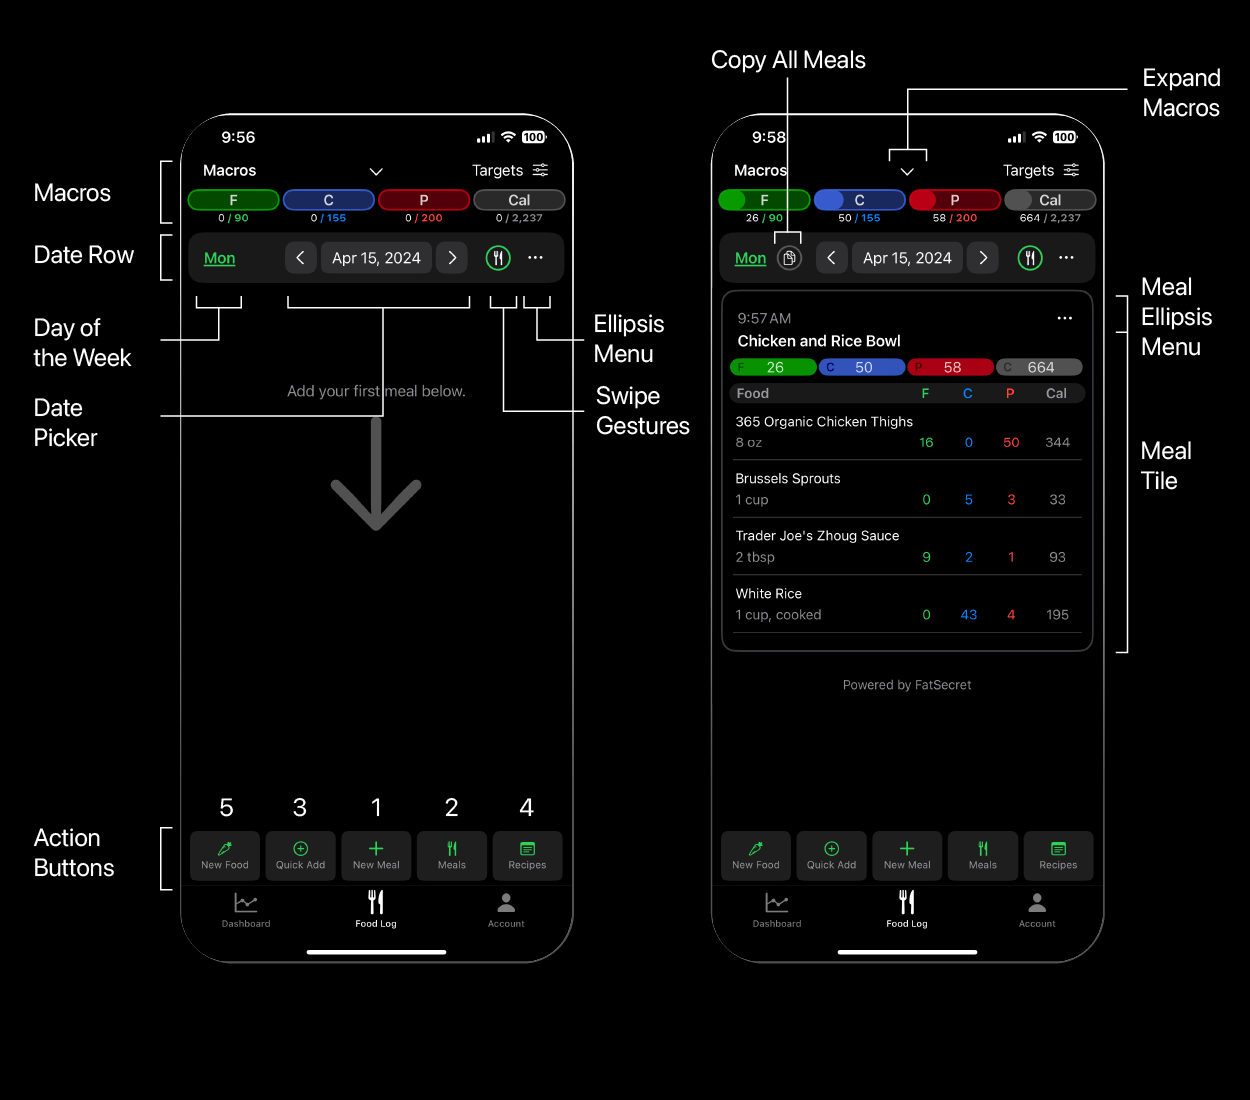
Macros
Going from top to bottom, we have the Macros section, which works exactly the same as on the Dashboard, displaying your current intake relative to your targets, with the option to click the “Targets” text to toggle the remaining macros to be shown instead. Tapping anywhere else in the macro area will show an enlarged version of the macros (the same as the Dashboard view) to more easily see your targets. This enlarged version can be scrolled up to see other micronutrients and minerals for the day.
Date Row
Next, we have the date row. On the left, you have the day of the week listed. If the day is highlighted green you are looking at a date within the current check-in period. If the day you are looking at is today, it will also be underlined. A day outside of the current check-in period is gray. This distinction is important because only food logs within the current check-in period can be edited. Logs from previous check-in periods can still be observed and copied, but can no longer be edited or deleted. If you tap on this day of the week, it will jump to today’s date if you aren’t already on it.
If the current date has at least one meal logged, you will see the copy all meals button to the right of the current day of the week. This copies every meal, including the times saved, making it easy to replicate entire days quickly.
In the middle of this row is the date picker. You can scroll through dates via the left and right arrows or you can tap directly on the date to bring up a larger calendar view and select a specific date.
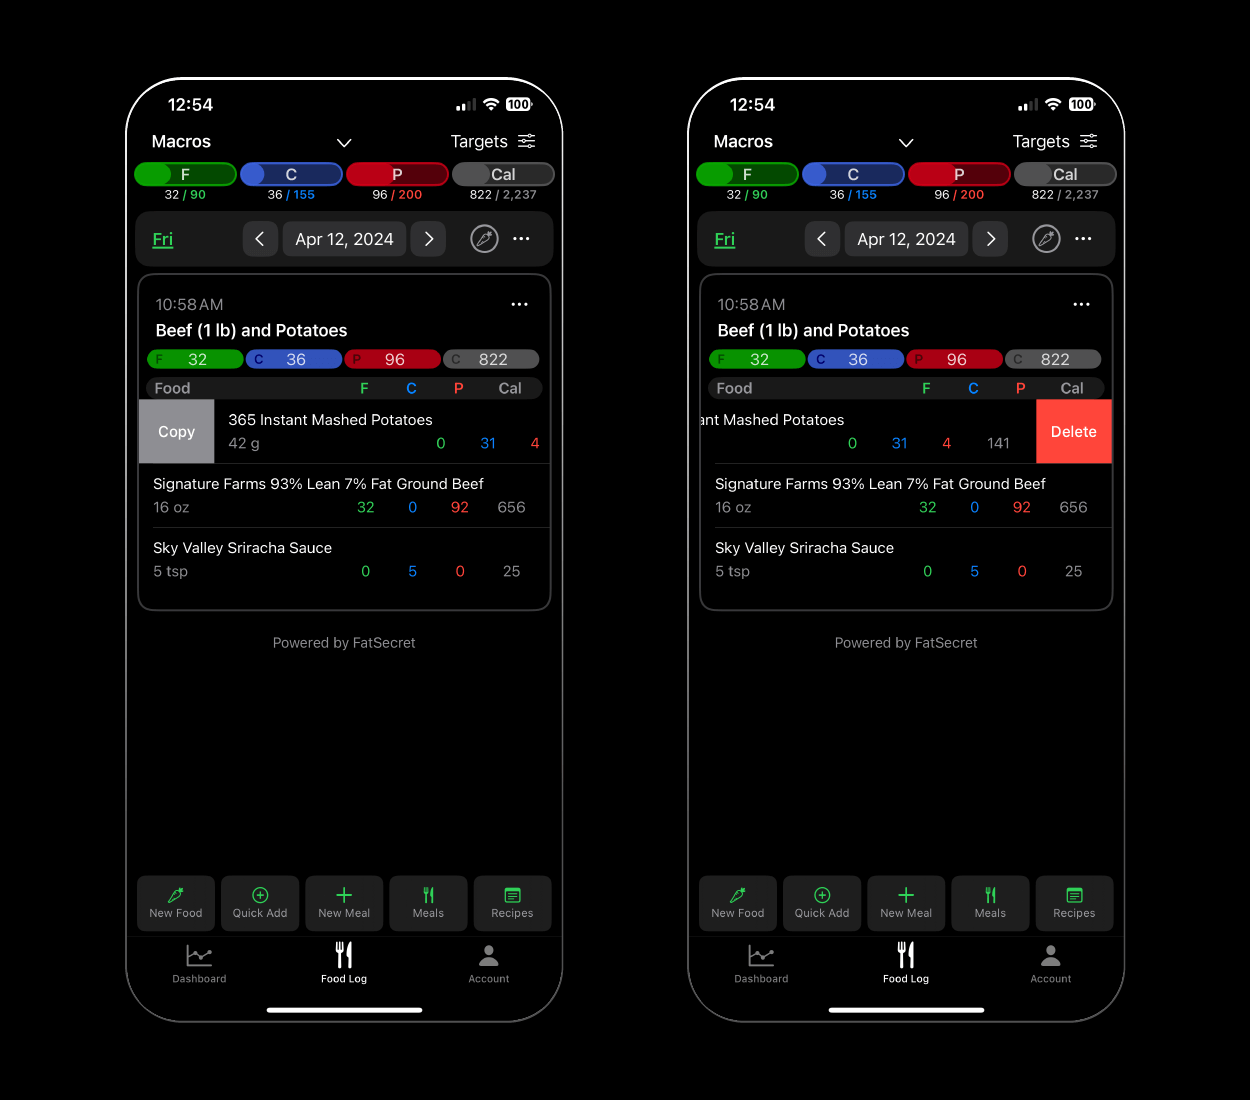
To the right of the date picker is the Swipe Gestures Toggle. This allows you to copy meals or foods from your log to be pasted into another day/meal. By default, this starts on the meal setting (knife and fork icon). This makes it so swiping from left to right on a meal will copy everything about that meal. This can then be pasted to any day’s food log without rebuilding the meal. Swiping from right to left on a meal deletes it. Note, that you can also click on the ellipsis menu “…” on any meal tile to copy or delete it.
If you tap the Swipe Gestures Toggle, it changes to a carrot icon, representing the food setting. This allows you to swipe on individual foods within meals. Swiping left to right copies a food and its serving size, which can be pasted to any meal (via the meal ellipsis menu “…”). Swiping right to left deletes the food from the meal.
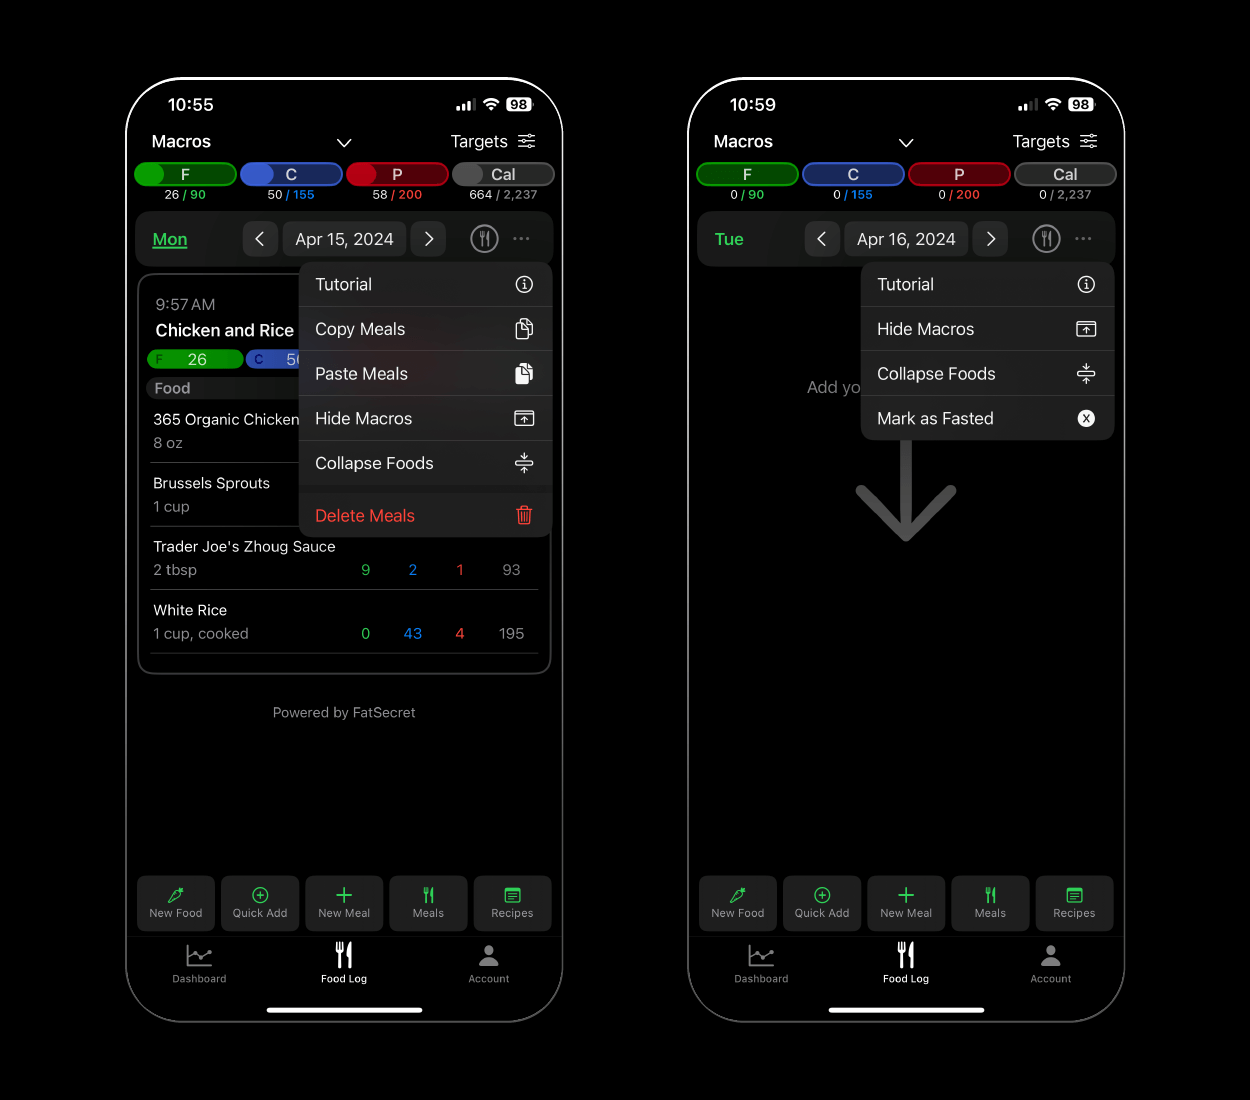
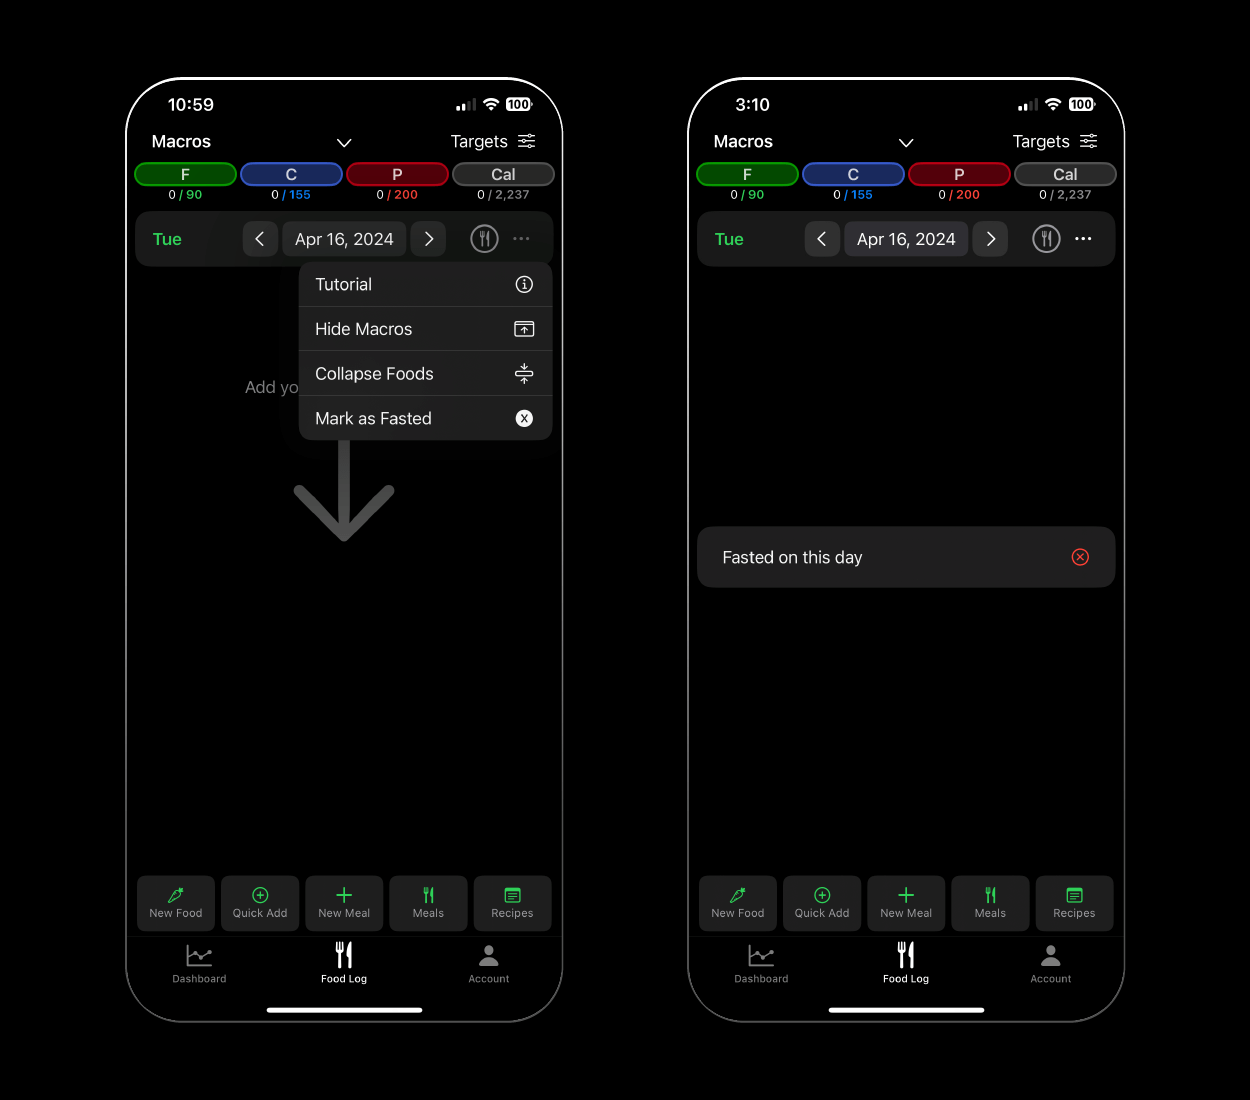
Finally, we have the ellipsis menu “…” on the date row, which provides a number of functions and customizations:
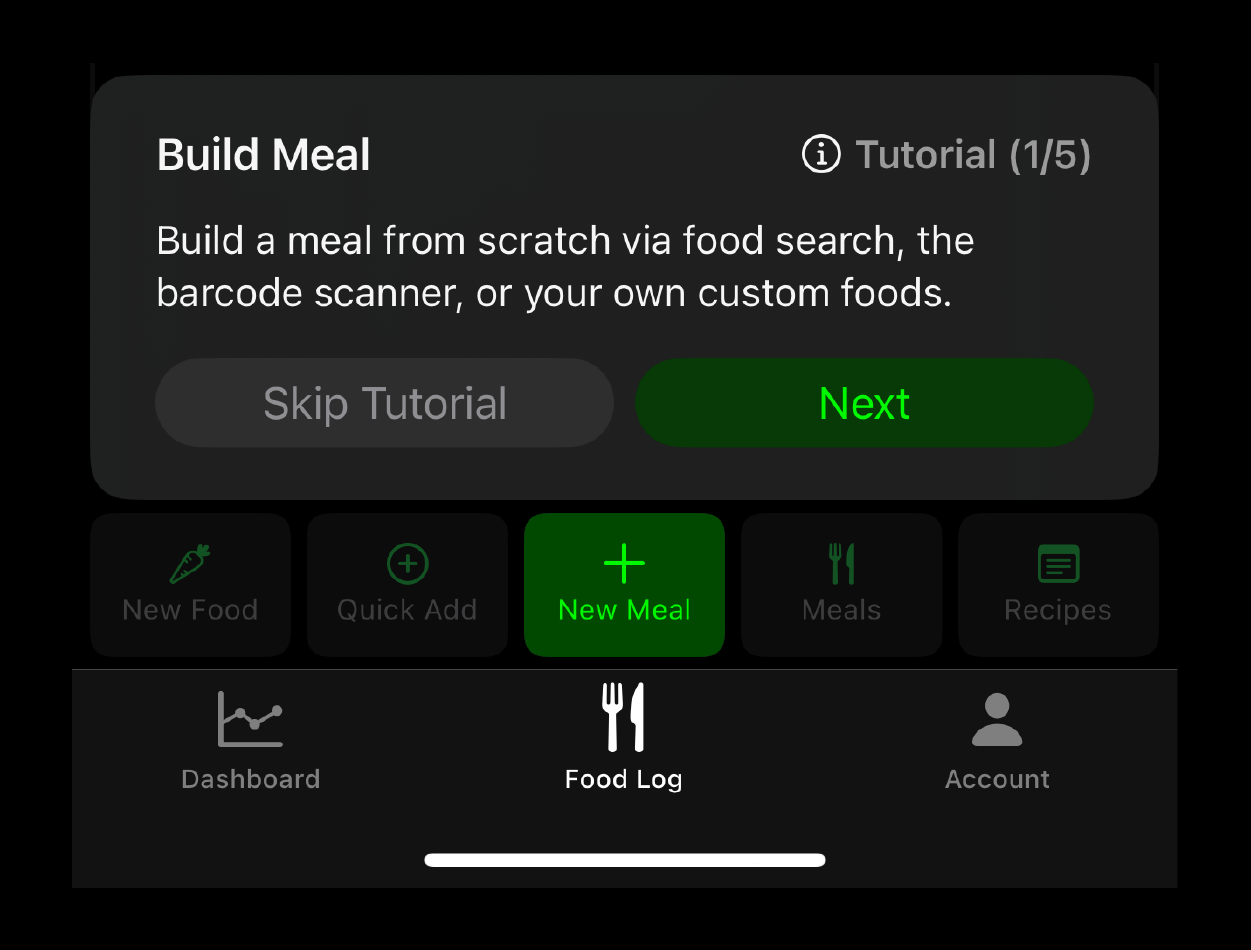
- Tutorial – If you ever need a refresher on how the components of the food log work, the tutorial button will walk you through everything again.
- Copy Meals – Copying meals from this menu copies every meal on a given day. This makes it very easy to copy and paste one day to the next if you ate the exact same things on back-to-back days
- Paste Meals – This is only visible if you have copied at least one meal. This pastes meals to the day you have selected
- Hide Macros – Removes the macros from the top of the screen extending the visibility of the meals list
- Collapse Foods – Truncates the food list of each meal into a single horizontally scrollable row to minimize the amount of space each meal takes up. You can also do this on a meal-by-meal basis using a meal’s ellipsis menu.
- Delete Meals – Deletes all meals on the selected day
- Mark as Fasted – This option is only available if you have not logged any meals on the selected day. This tells the algorithm to track this day as a zero-calorie day instead of skipping it in the weekly calculations
Action Buttons
Below the date row is a large empty space where logged meals will appear. At the bottom of the screen, you have the action button row consisting of:
- Build New Meal
- Favorite Meals
- Quick Add Meal
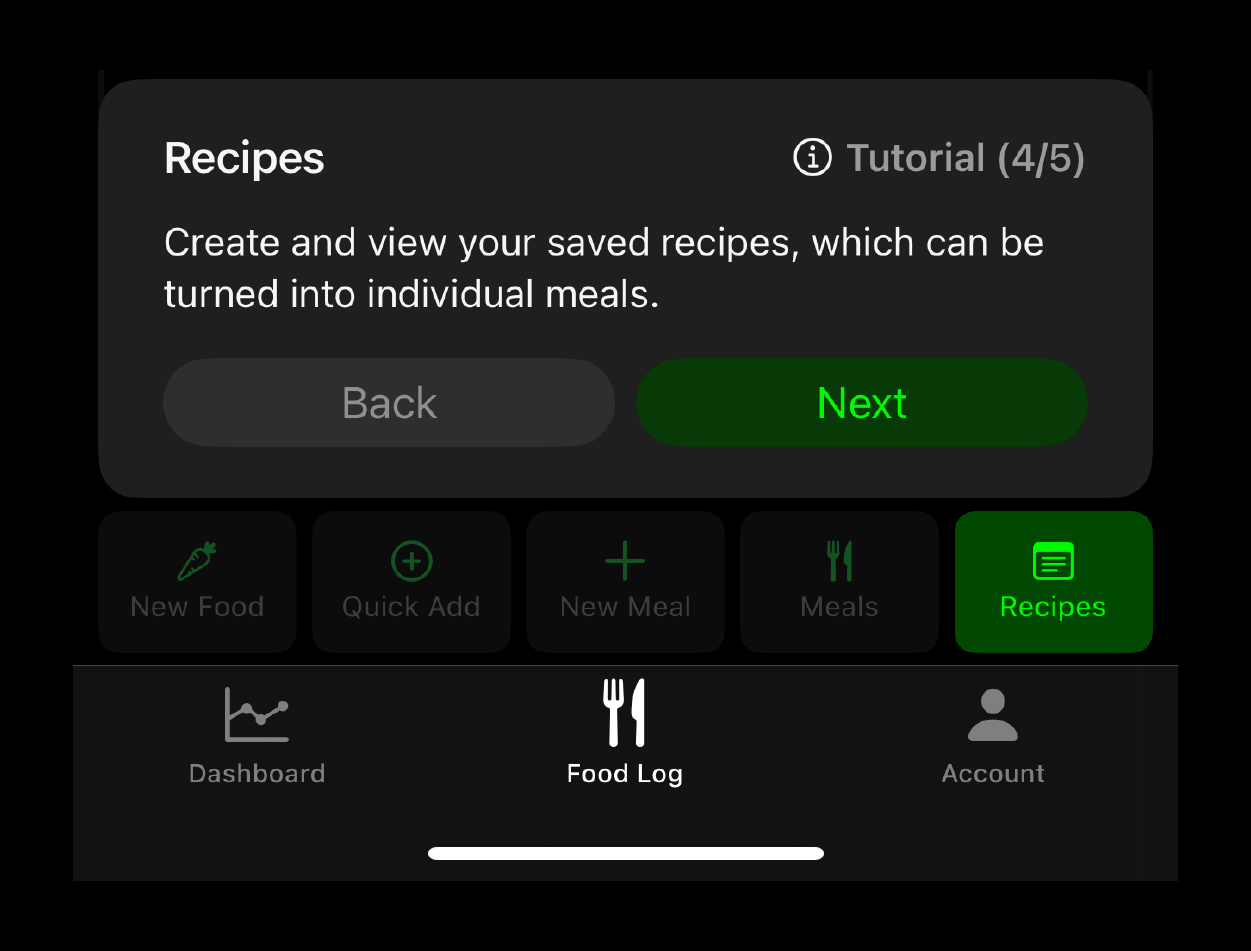
- Recipes
- Create a New Custom Food
1. Build New Meal
Your main action will be building new meals, using the “+ New Meal” button in the middle. This takes you down the build meal path.
The build meal path consists of five sections:
- (a) Search Food Database
- (b) Custom Foods
- (c) Favorite Foods
- (d) Favorite Meals
- (e) Recipes
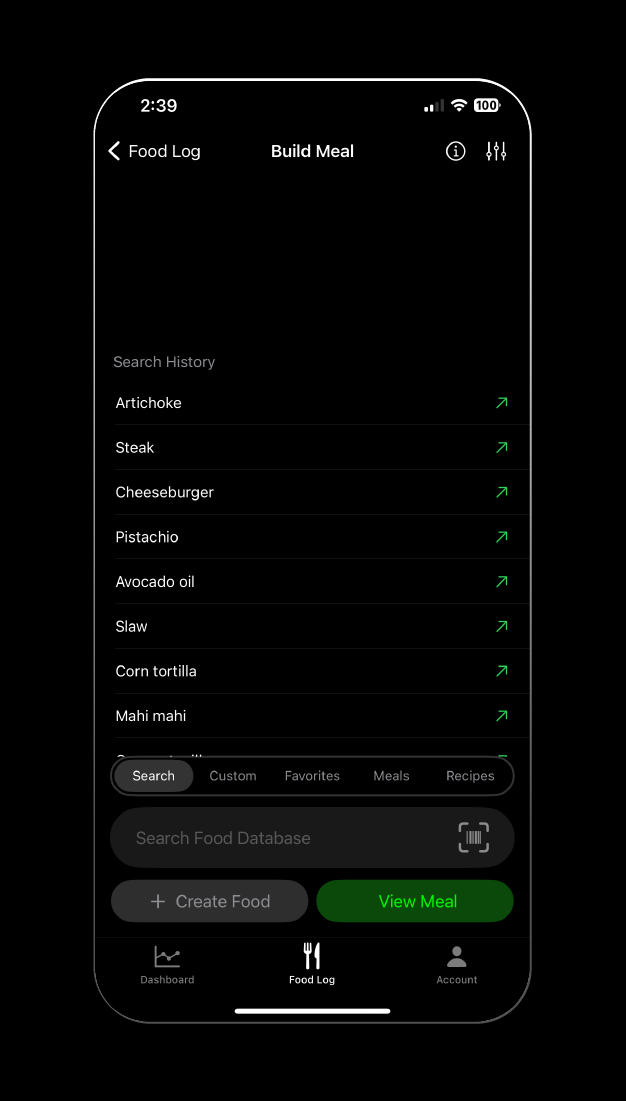
1a. Search Food Database (Build Meal)
When you land on the build meal screen you will be on the “Search Food Database” setting. This allows you to search for any food or meal across over 1 million verified options. Simply type in a food name and hit search. Alternatively, you can tap the barcode viewfinder on the right side of the text field and scan a food’s barcode to look it up if you have it on hand. Searched foods will appear in the search history above the search bar. This saves the last 20 options you’ve searched in order and entries can be deleted by swiping right to left on them.
If you find a food in the database you wish to use and notice the nutrition information looks different than the food label, this is because Macro Chief shows you macro-based calories (summing the calories from fats, carbs, and protein into a calorie total), which are far more accurate than Food Label calorie counts. This is due to legal ranges that foods can be “off” of their true values. If you’ve ever seen a Vitamin Water Zero that lists calories as 0, but still has 4g of carbs, this is a perfect example. Every gram of carbs is 4 calories, so the true calorie value of this drink is 16, but they are legally allowed to put 0. While 16 calories is nothing, if you have 10 in a day, 160 calories over long periods of time can make a difference. This is not a shot at Vitamin Water, it just illustrates a point because thousands of products are like this.
The one instance where macro-based calories are not used is alcoholic beverages. Alcohol is its own macronutrient containing 7 calories per gram. That is beyond the scope of this article, but in the case of alcoholic beverages, the nutrition label calorie total is what Macro Chief displays.
Another difference you will notice between Macro Chief and a food’s label is in the carb allotment. Macro Chief shows you net carbs in a food, meaning the total carbs minus fiber. Fiber is not digested, therefore those calories aren’t used and can be ignored. These differences are a major advantage Macro Chief provides by showcasing the most accurate nutrient values possible.
If you select a food from the search you will be taken to that food’s Detail View. This view lets you look at the macros and calories of the food based on various units of measurement and adjust the serving size to then add to a meal. Tapping anywhere on the macro chart will open an expanded view of the total nutrients in the food, including a distinction between total carbs, fiber, and net carbs.
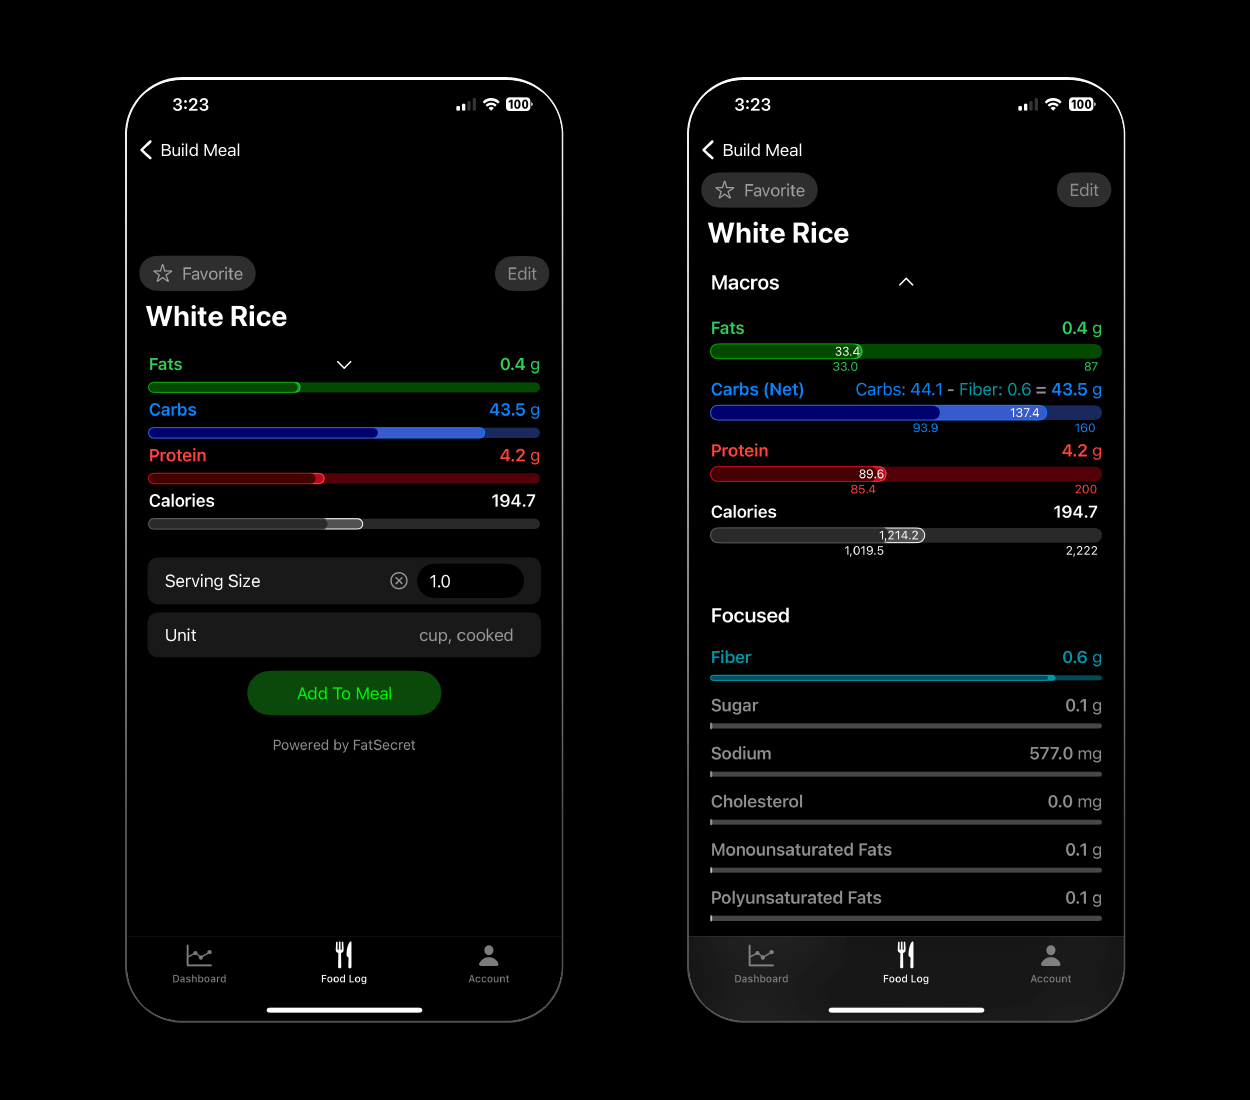
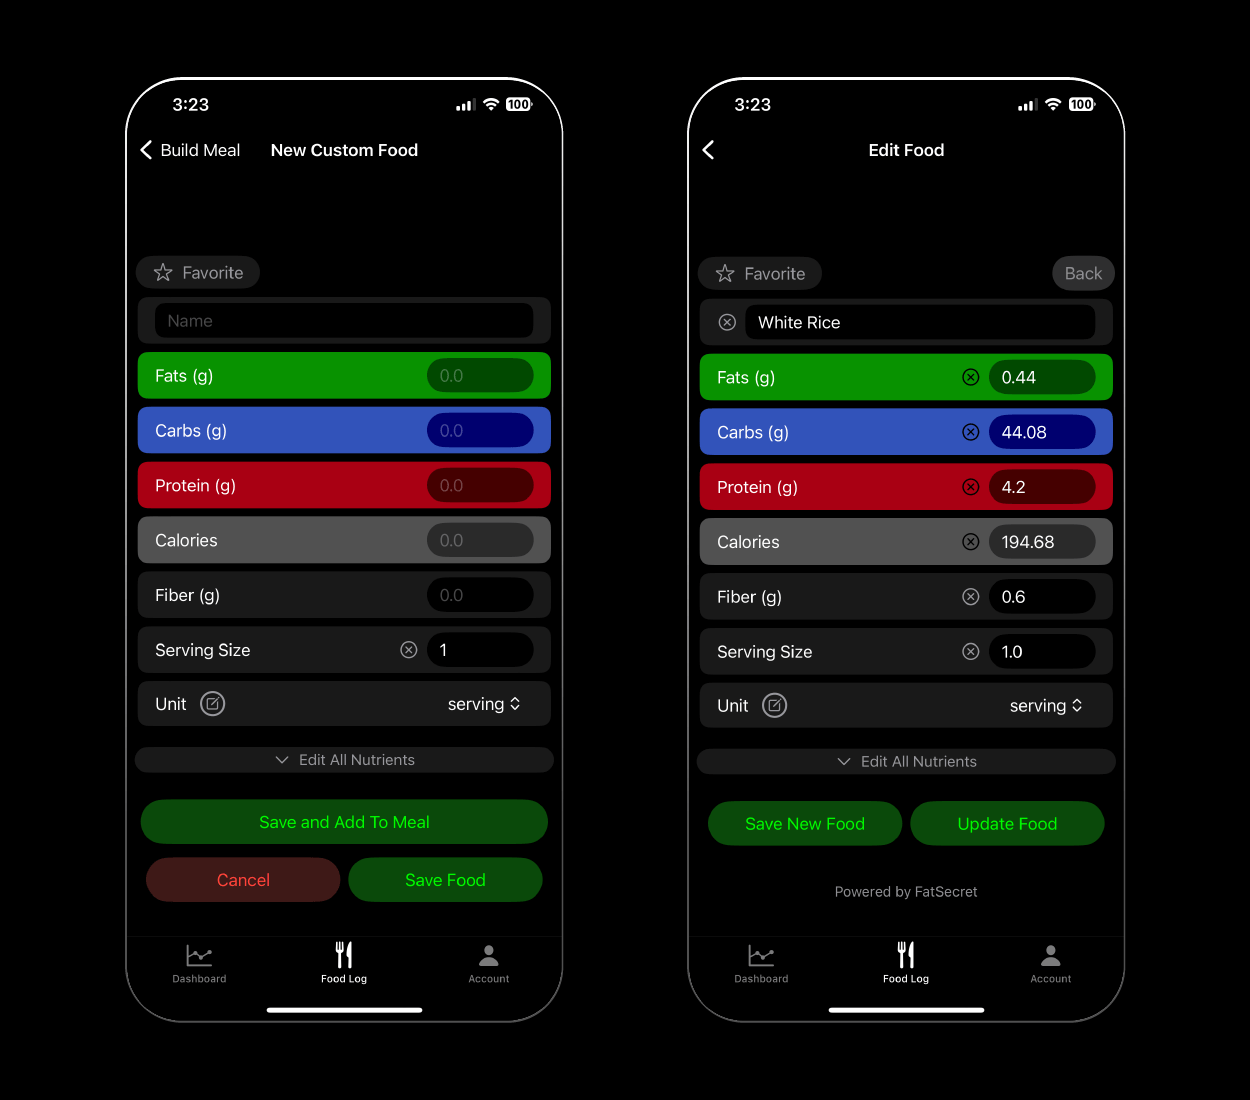
You can favorite any food, saving it to your favorite foods list for easier access in the future. Additionally, you can edit any searched food if the numbers are off, saving it as a custom food.
If a food from the search defaults to the serving size you wish to add to your meal you can simply swipe left to right on that food row and it will be automatically added to the meal you are creating. This swipe action can be done on any food, meal, or recipe.
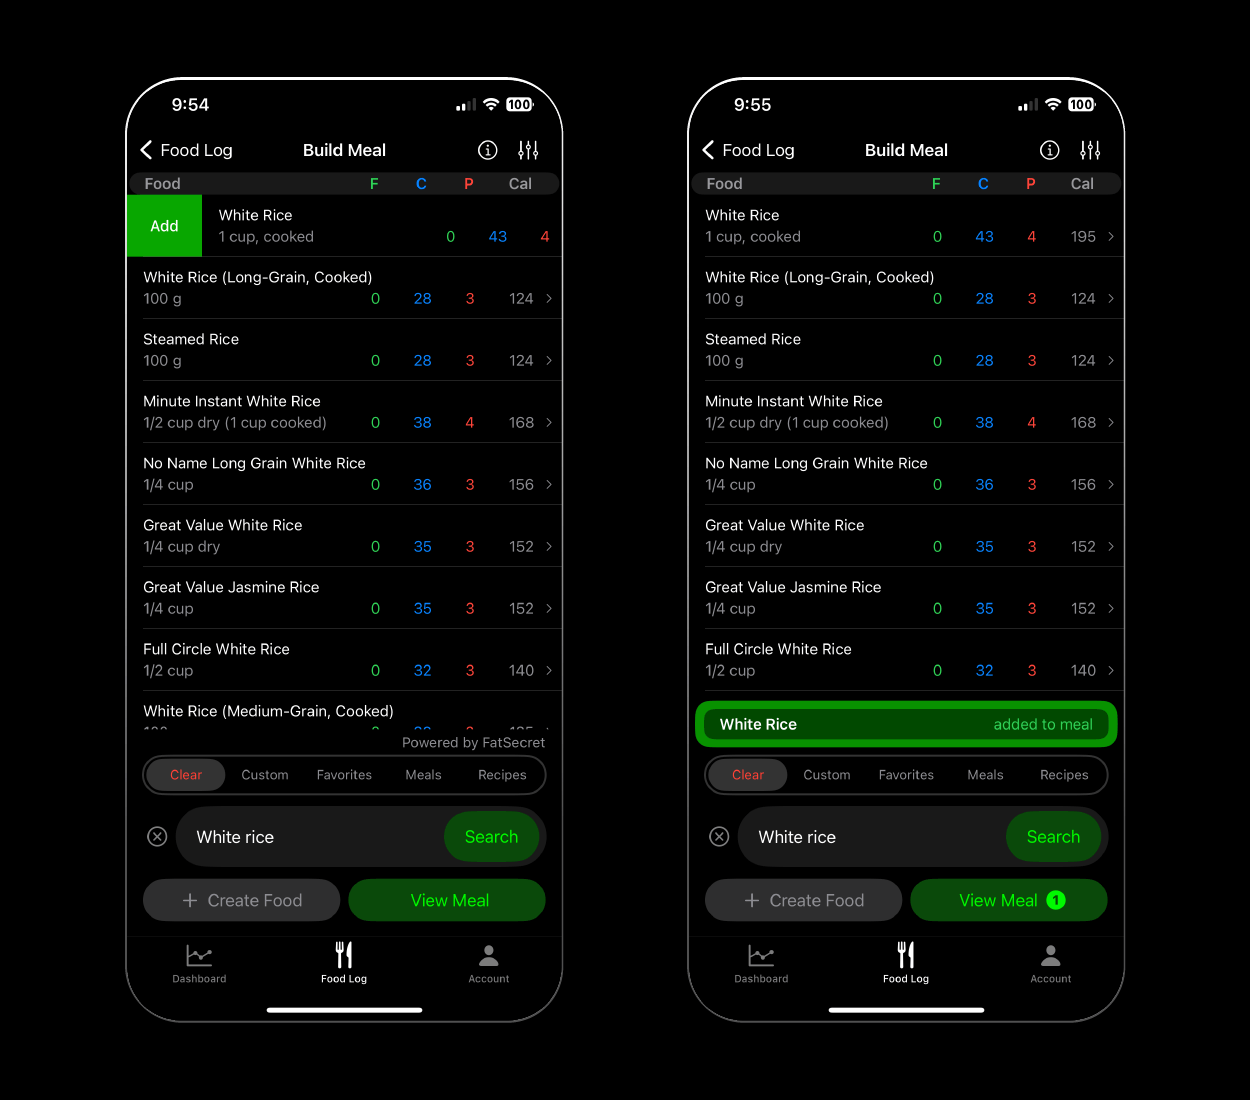
In the top right corner of this page, you also have the option to change your sorting method. By default, the results returned from the search are prioritized by relevance, but you can change this to sort by highest/lowest of any macros/calories, or alphabetically.
1b. Custom Foods (Build Meal)
This is a list of user-created foods, either built from scratch explained here, or by editing a searched food. Default servings of custom foods can be added to your meal by swiping left to right on the food row. Custom foods can be deleted by swiping right to left on the food row.
1c. Favorite Foods (Build Meal)
Any foods you plan to use regularly can be favorited via the food detail view “Favorite” button. Default servings of favorite foods can be added to your meal by swiping left to right on the food row. Foods in this list can be removed by swiping right to left on the food row.
1d. Favorite Meals (Build Meal)
You can observe meals you have saved as a favorite (a collection of foods and their servings) to be used in new meals you create. If you simply wish to log a favorite meal a faster route is directly from the favorite meal action button on the food log. From the build meal path, favorite meals allows you to add all foods from that meal to a new meal you are building. So instead of logging a favorite meal and then having to go back and edit it you can simply select a favorite meal from this list, add all the foods and their serving sizes to the new meal you are building, and continue on your way.
Default servings of foods within a favorite meal can be added to your meal by swiping left to right on the meal row.
1e. Recipes (Build Meal)
Similarly to favorite meals, servings of a recipe can be added to a meal you are building. Servings of a recipe are displayed as a single line item instead of separate ingredients. This can be useful if you have a recipe saved for a particular meal that you are then pairing with a recipe for a side dish.
If you just wish to log servings of a recipe as the entire meal, a faster way to do this is by selecting the recipe action button from the food log rather than adding the recipe servings to a new meal you are building. They both work this is just an extra step if you aren’t adding anything else.
Recipes have an additional sorting option called categories which can help filter your search if you have a long list of recipes. There are numerous default categories and you can also create your own (and delete the default ones).
Default servings of recipes can be added to your meal by swiping left to right on the recipe row.
1f. View Meal (Build Meal)
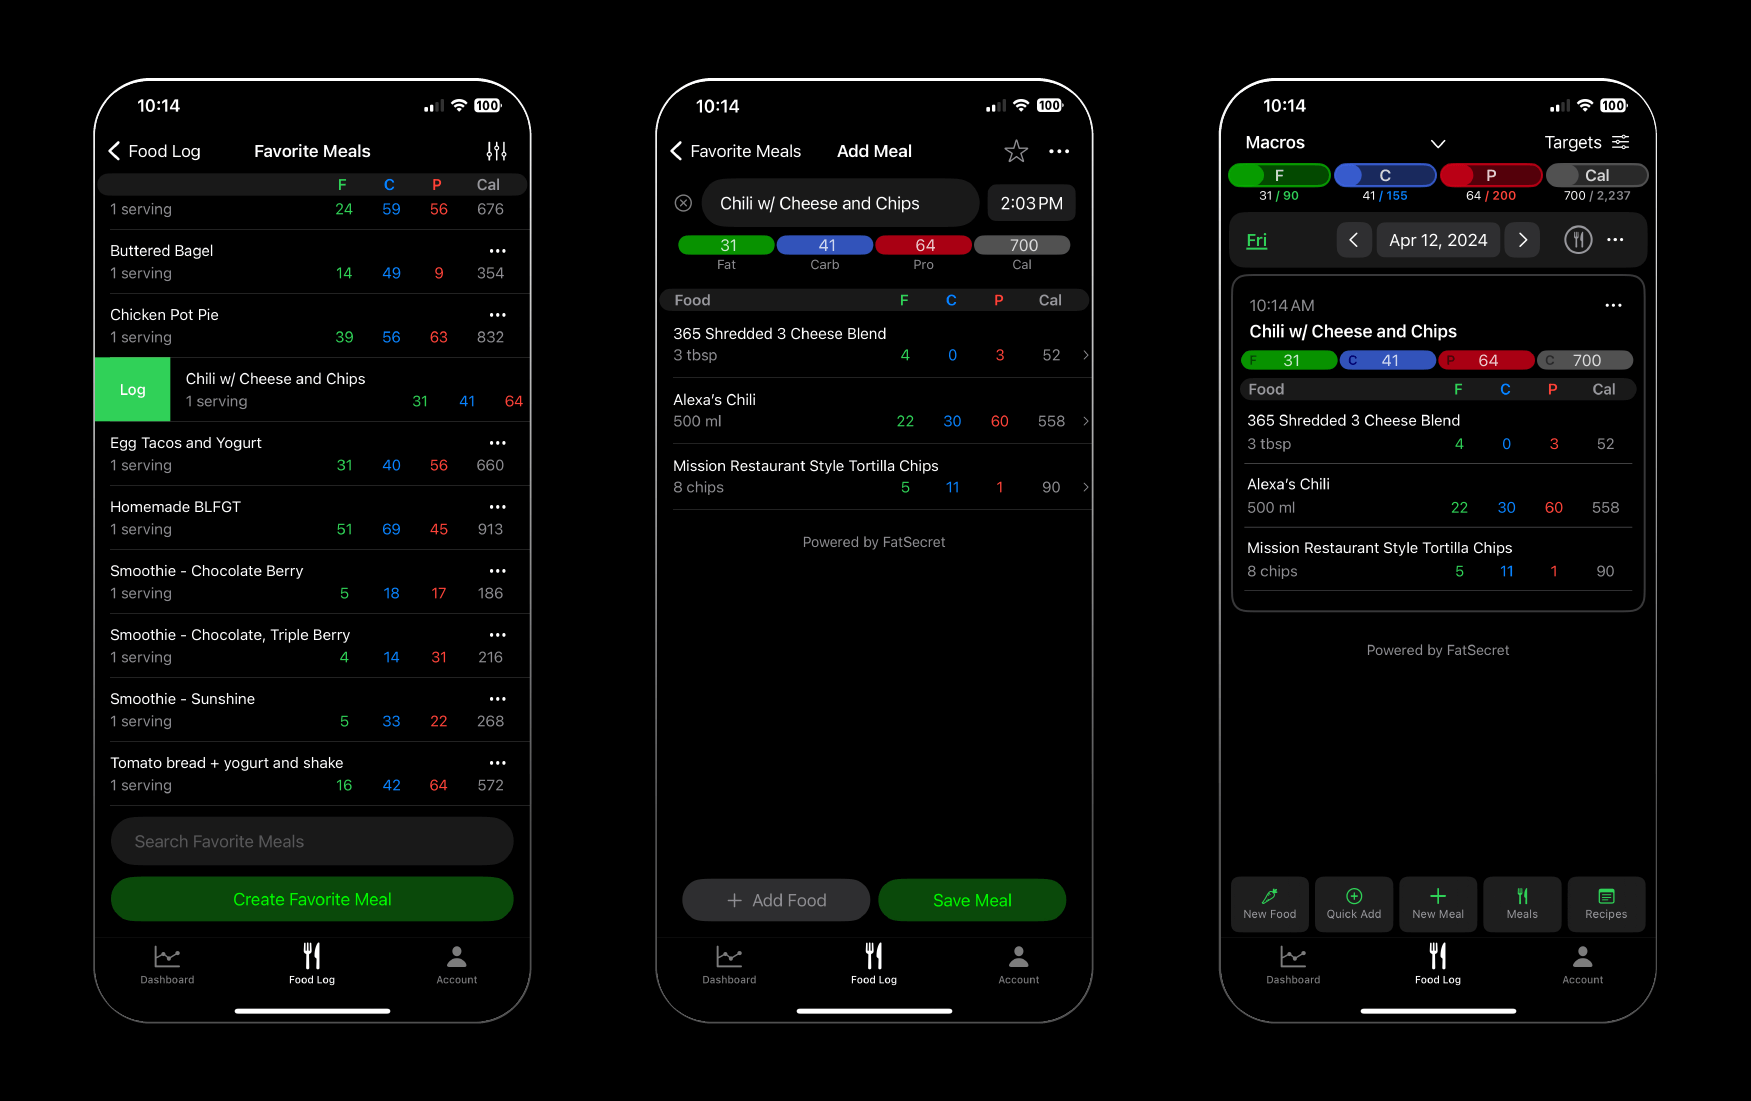
Once you’ve added all of your foods to your meal, or if you want to check what you’ve added, tap the “View Meal” at the bottom right corner of the build meal screen. This button will have a number listed representing how many foods have been added to the meal (if any exist). The add meal screen is where you go to save your meal to the food log and is also the screen you will be taken to in the event you edit a previously saved meal.
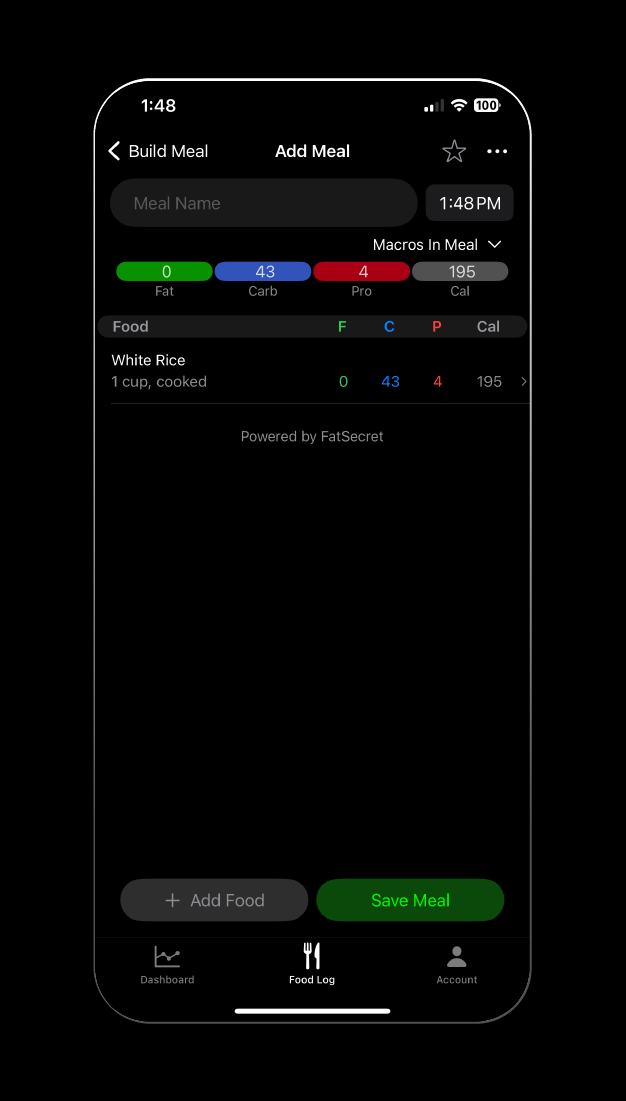
Here you can give the meal a name (not required), change the time you ate, view the macros/calories in the meal, view the macros/calories you have remaining in the day prior to this meal, and view the macros/calories remaining after you log this meal (by tapping the “Macros in Meal” text).
You can save the meal to Favorite Meals by selecting the star in the top right corner (which will turn yellow when actively a favorite) and the ellipsis menu “…” will allow you to view the meal’s expanded nutrient view, paste any foods or meals copied to the clipboard, or delete all of the foods from the meal entirely.
If you need to edit a food in the meal, select the food row and you will be taken to the detail view to edit the serving size and or unit, or remove it entirely. Foods can also be deleted from the Add Meal Screen by swiping right to left on the food row. Foods can be copied by swiping left to right on the food row.
If you need to add food to the meal, the “+ Add Food” button in the bottom left will take you back to the food search section of the build meal path. Once the meal is good to go, click “Save Meal” and it will be logged and you will be taken back to the Food Log.
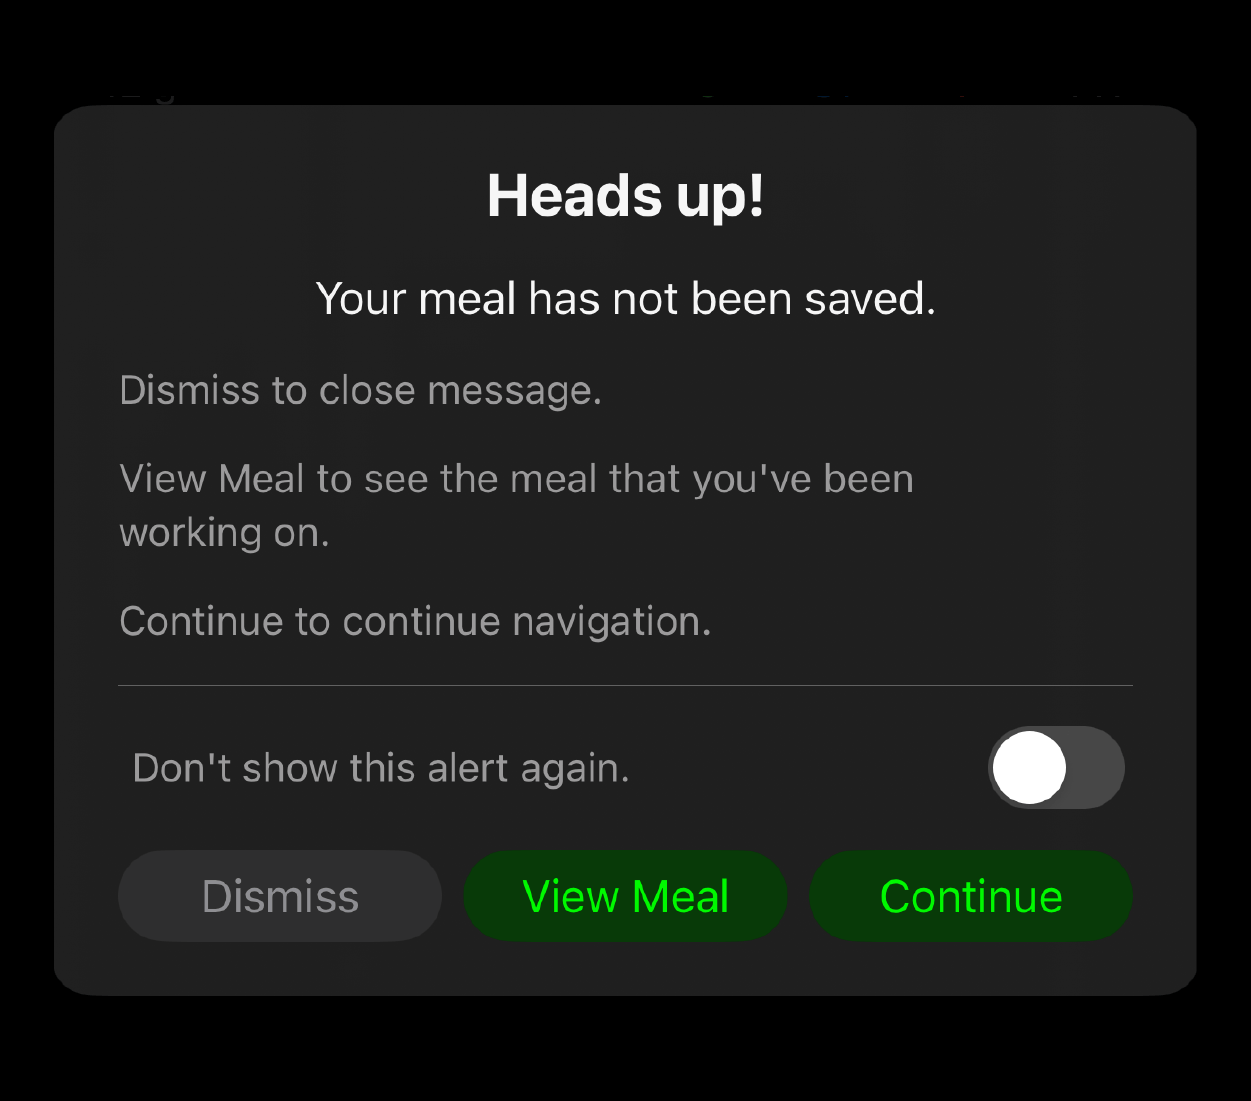
If you have food added to a new meal you are building and then try to navigate back to the root view of the Food Log you will see a warning message displayed that you have not yet saved this meal. This message can be toggled off and re-enabled/disabled in the Account > Settings > Preferences > Meal Not Saved.
2. Favorite Meals
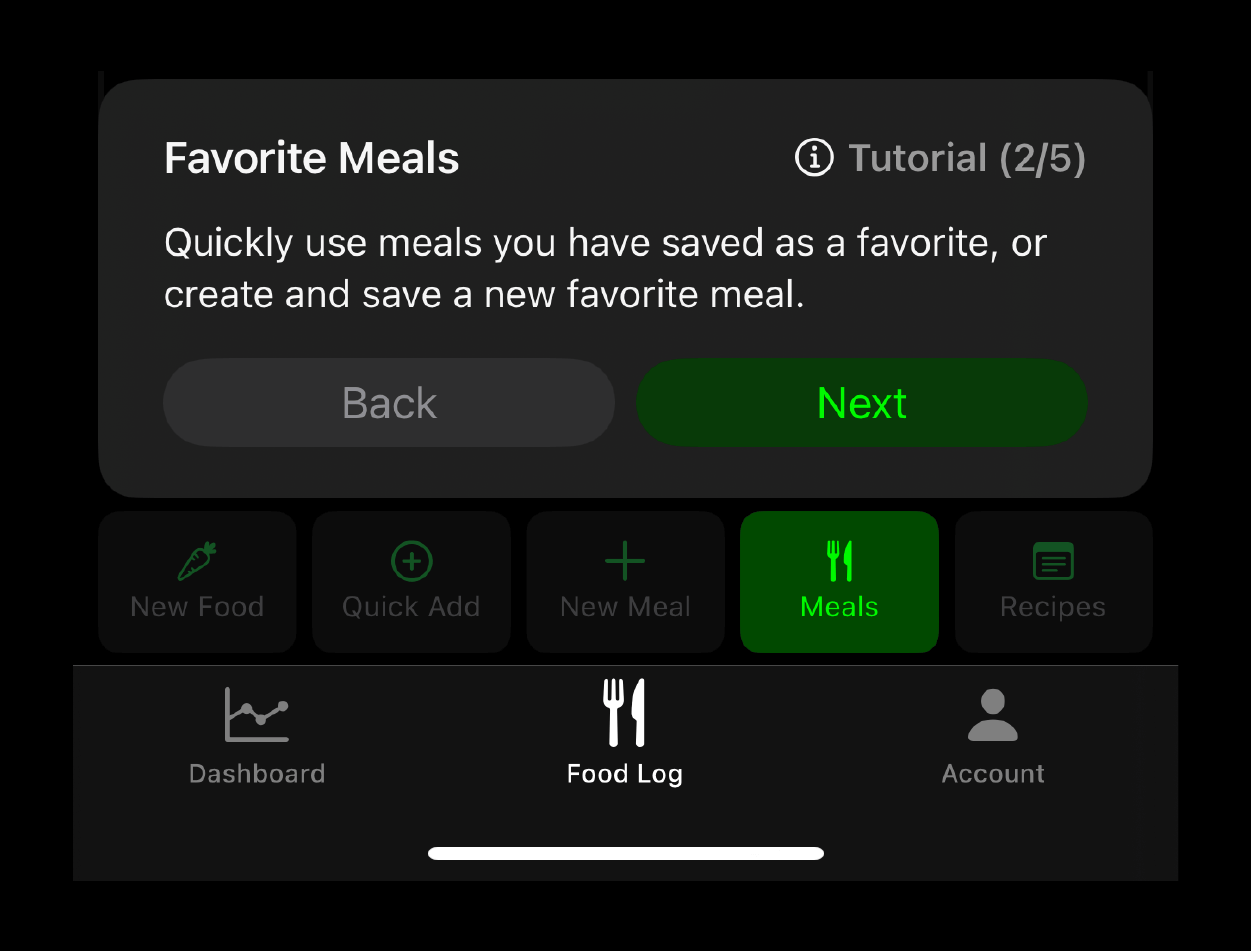
Now we are backtracking to the root of the Food Log. The second action button we will explore is the Favorite Meals Button “Meals”, to the right of “+ New Meal”. This takes us to the Favorite Meals list, which will be blank when you first begin using the app.
You can either build Favorite meals directly from this page or if you have already logged a meal you want to favorite, click on the ellipsis button “…” in the top right of the meal tile and select “Favorite”. This will cause that meal to appear in the Favorite Meals list.
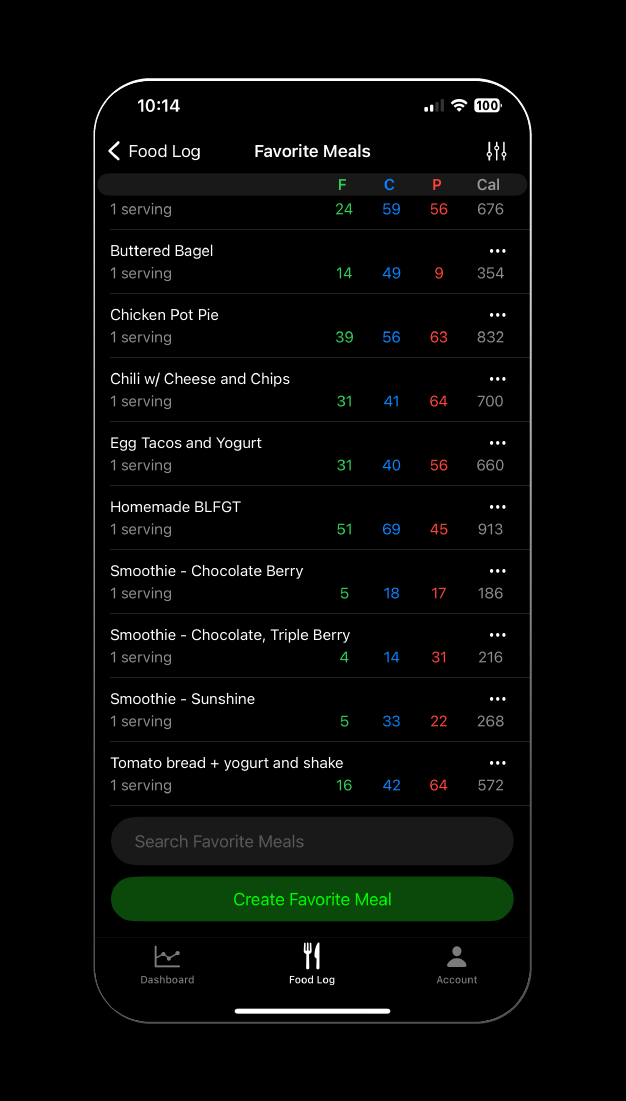
Like the food search within the build meal path, the favorite meals list can be sorted in a large variety of ways from alphabetical (default), newest/oldest, and high/low macro or calorie order.
Also like the food search, if you need to log a favorite meal and it doesn’t require any changes you can swipe left to right on the meal row to log it directly to your food log.
If you select a meal from this list you will be taken to the Add Meal screen, which shows all the ingredients in this meal and the total macros and calories. From here you can add to this meal or change/remove ingredients to suit whatever you need to log. Editing from this page does not impact the saved state of the favorite meal.
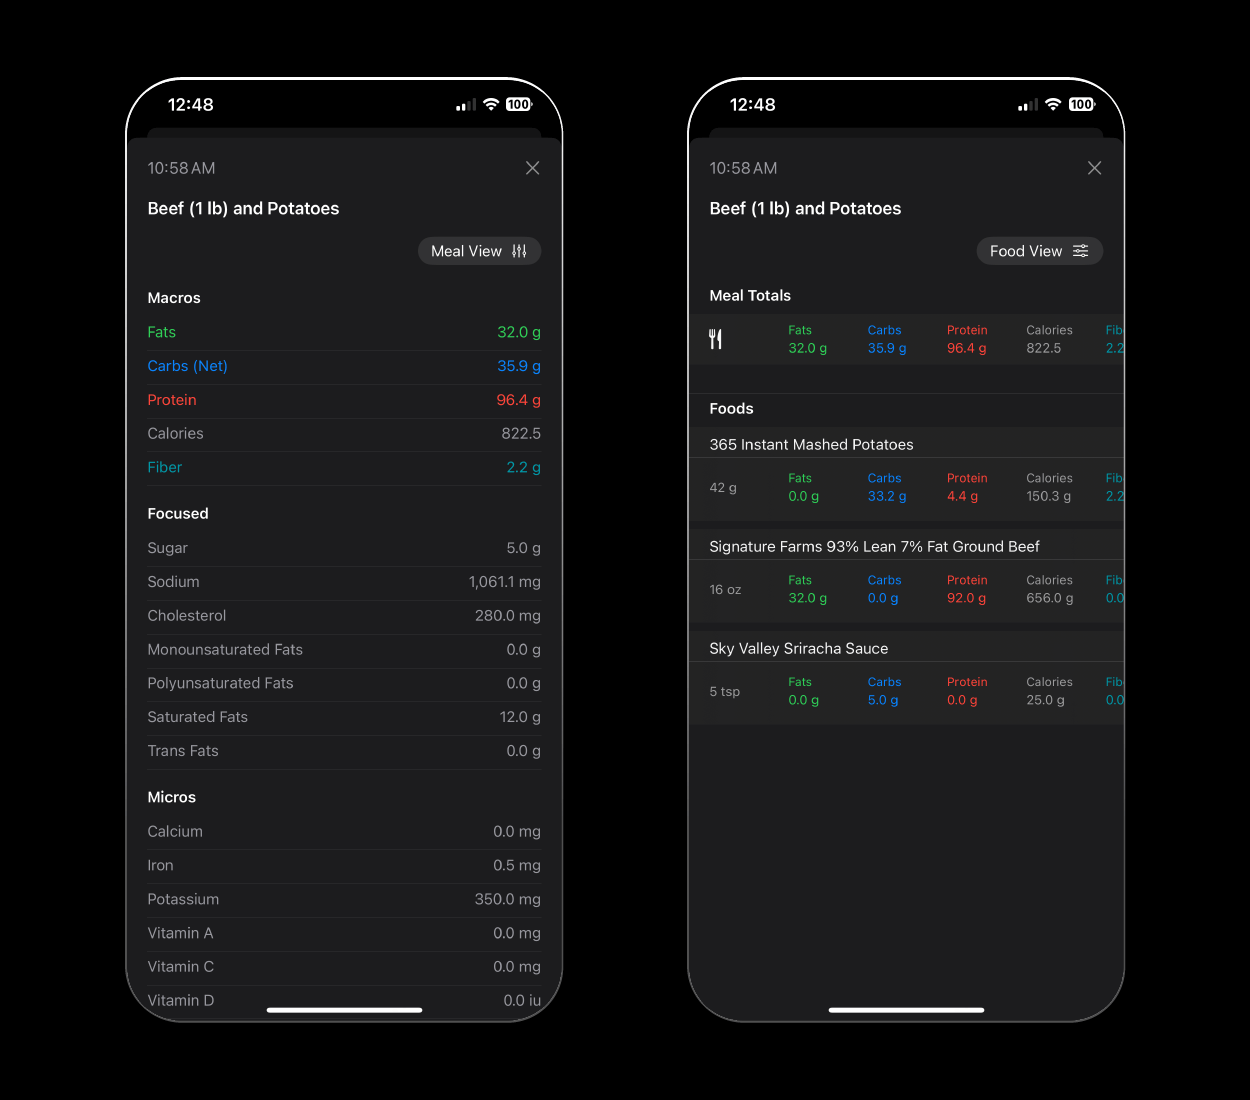
If you wish to permanently edit a favorite meal, select the ellipsis button “…” on the far right of the meal row in the Favorite Meals list and select edit. This menu also lets you quick log the meal (same as swiping left to right), and show the full nutrition of the meal (a highly detailed view of all nutrients that looks at the totals of the meal and can also be broken down into individual food contributions) and the option to delete a favorite meal (which can also be done by swiping right to left on the food row).
Deleting a favorite meal can only be done from this screen (you can not delete favorite meals from the build meal path).
3. Quick Add Meal
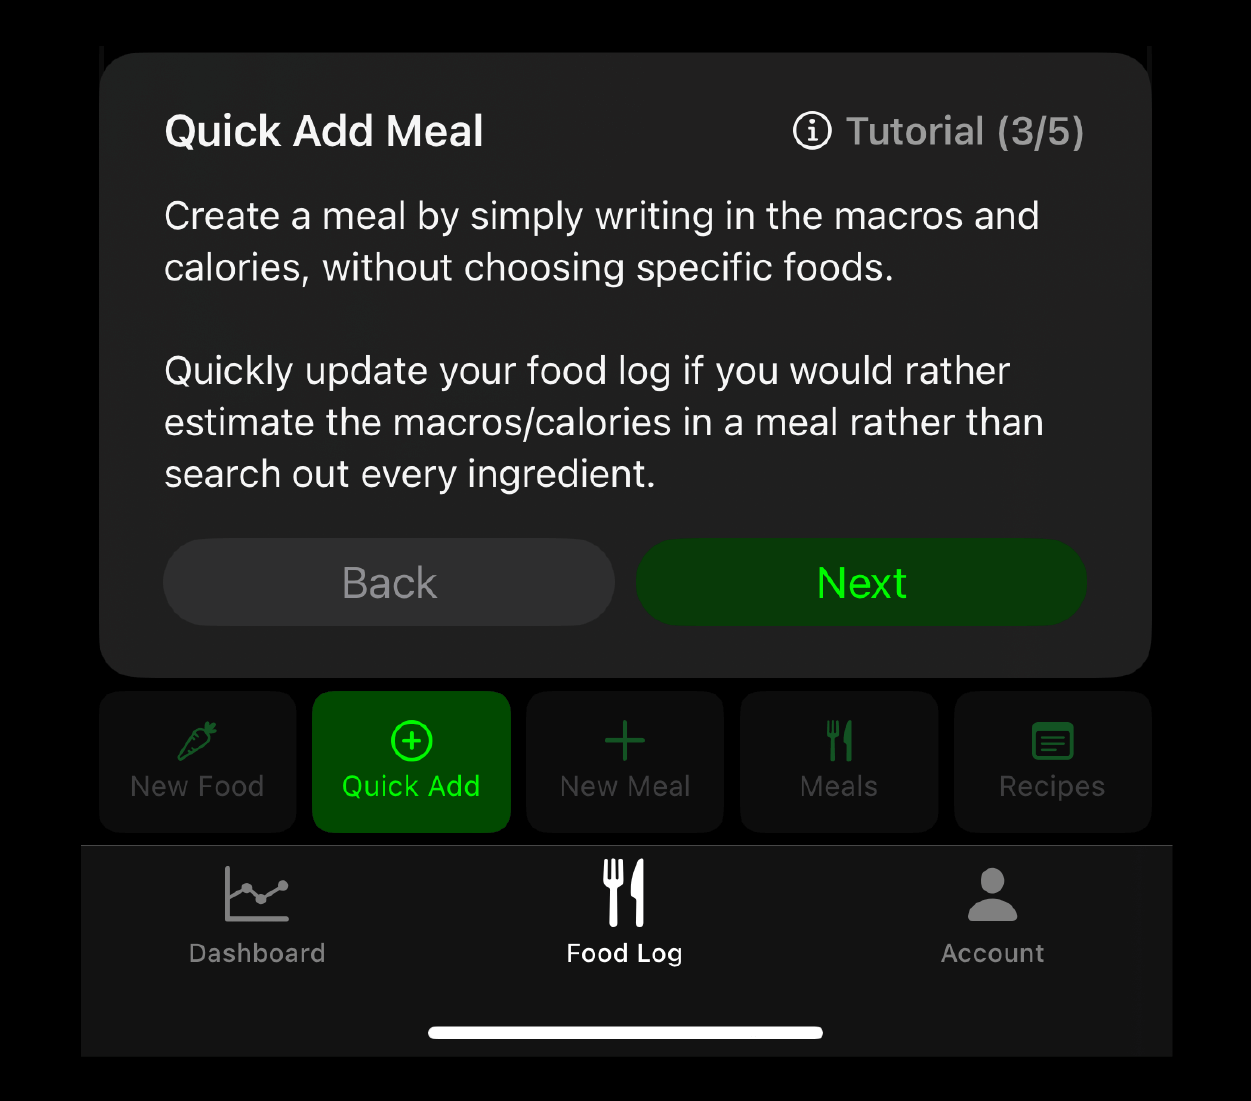
Back to the root of the Food Log, the next action button we are looking at is the Quick Add Meal “Quick Add”. This serves a few purposes. If you want to estimate the macros and calories in a meal without logging each ingredient, you can do so here. Simply log each nutrient and save it to update your food log. Or if you are eating a one-off meal from a restaurant that you can look up the nutrition facts for but don’t care to store for future use, the quick add meal is a great option.
You may also have a day where calories are extremely high, be it a birthday celebration, sporting event, etc. and you simply want to indicate that you ate a lot of food without going piece by piece through your day, you can write in high totals and give your best estimate.
When writing in the macros, the calories will be calculated automatically if you leave the calorie field blank. If you add any fiber, that amount will be subtracted from the total carbs and the meal will display the net carb and calorie total.
Quick Add Meals show up in the food log without any foods listed.
4. Recipes
Once again to the root of the Food Log, we have the Recipes action button, which takes us to the recipes list. Creating a new recipe differs from creating a meal in that you can save all of the ingredients for the entire recipe, divide it into servings, which can be saved to meals, and categorize recipes to more easily sort through them.
Creating a recipe starts by naming it, listing the total servings, and setting the unit of the servings, which can be customized completely.
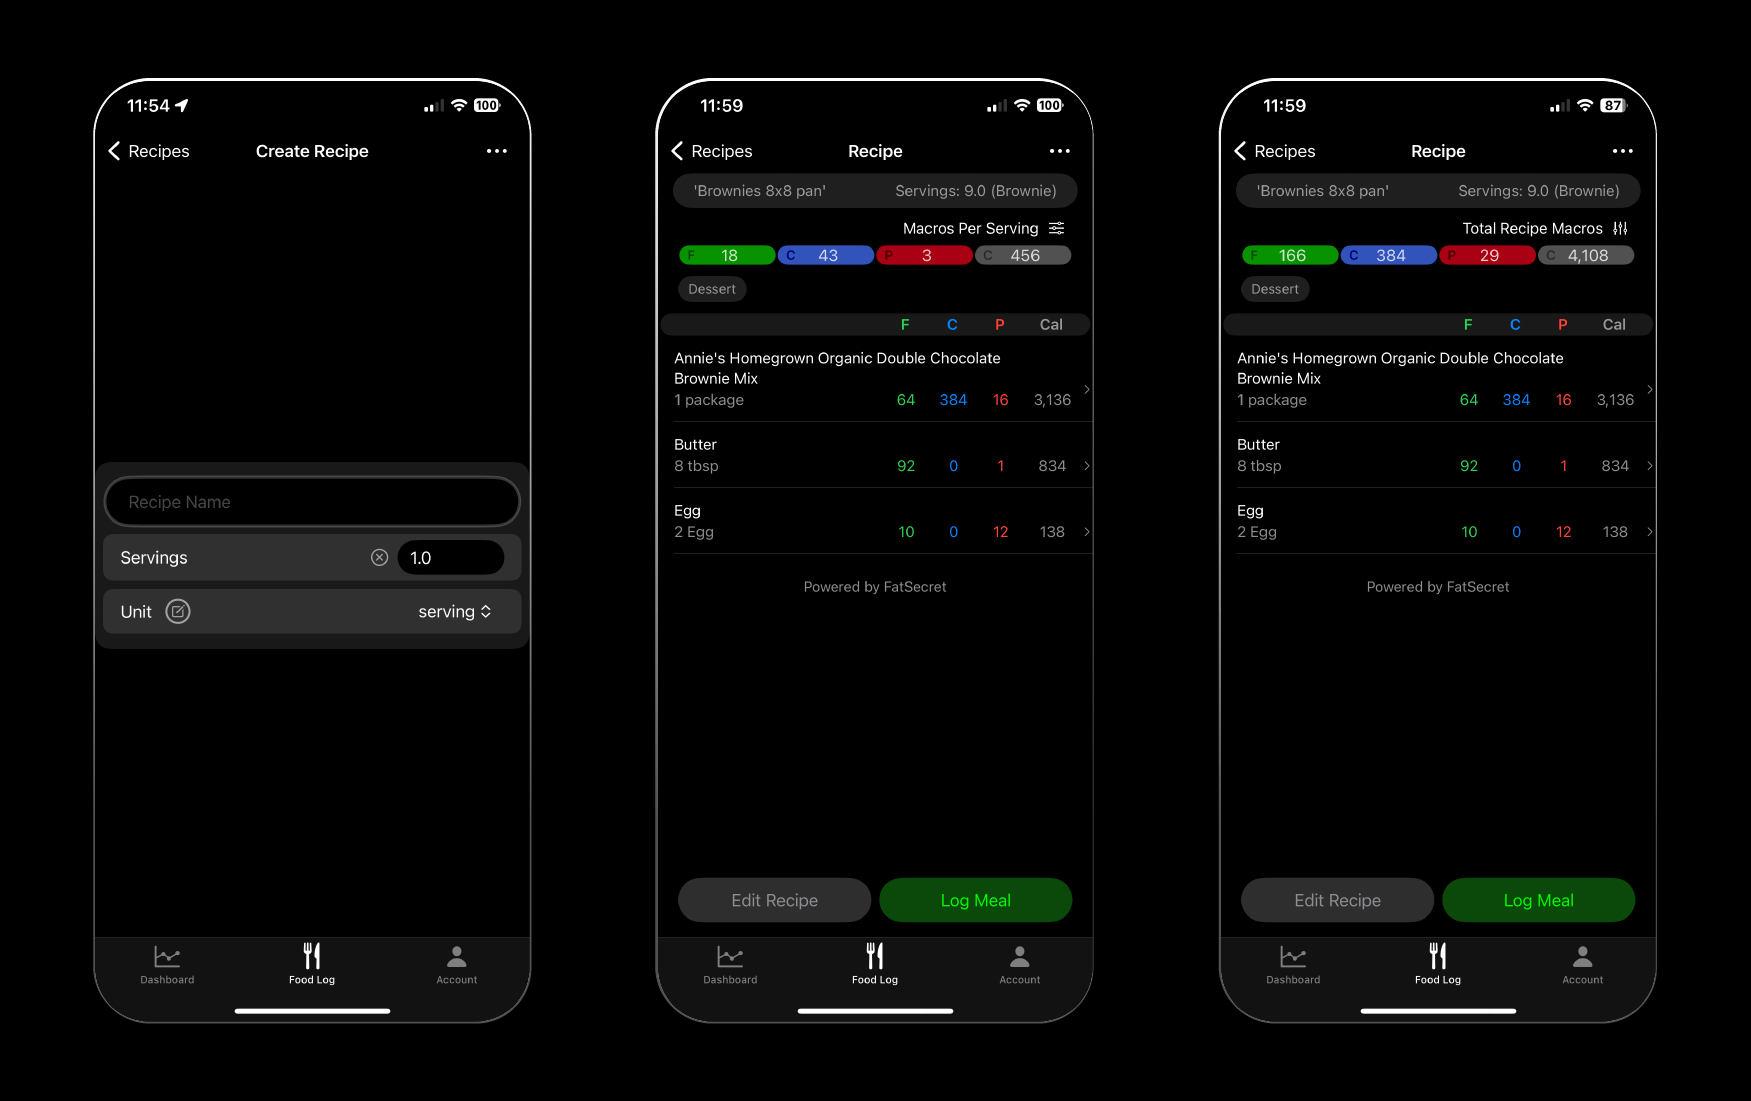
Building a recipe is done in the exact same way as a meal. You can search the food database for ingredients, check through your custom and favorite foods lists, add foods from favorite meals, and even add servings of other recipes to a recipe.
An additional step to recipe creation is categorization. A list of categories is provided by default (which can be deleted), and you can also write in your own categories. Please note, if you delete all of the default categories without providing your own, the default options will be reloaded.
From the recipe creation screen, you also have the option to view the macros per serving in the recipe or the total macros of the recipe by tapping the “Macros Per Serving” text below the recipe name and serving banner at the top right.
Pressing and holding on the macro row at the top of the recipe will pull up the full nutrition sheet detailing all of the micronutrient and mineral totals of the recipe as well. This can also be accessed via the ellipsis menu “…” in the top right corner of the screen.
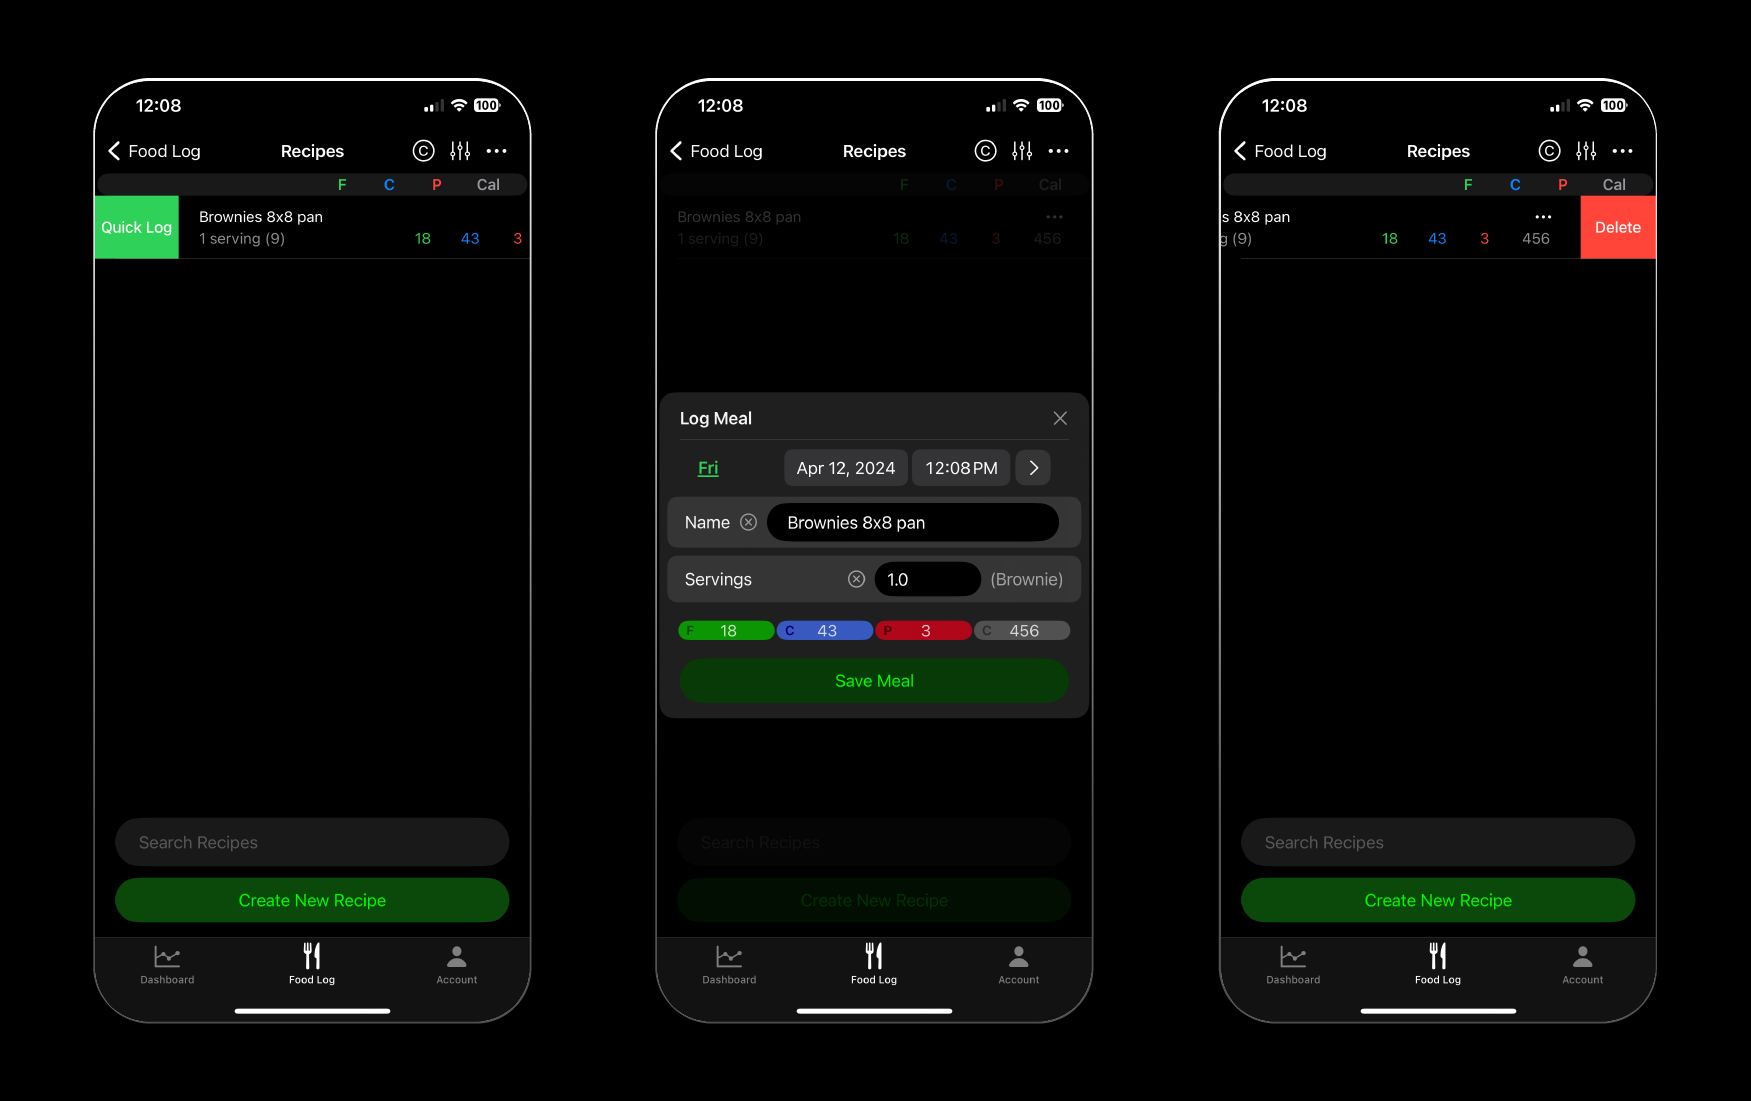
Logging recipes to the food log from the recipes list will save however many servings of that recipe you choose in a new meal. If you wish to add recipe servings to a meal with additional foods you can do that through the build meal path (#1 in this list).
5. Create Custom Food
Occasionally you may encounter a food that isn’t listed in the database, or you may simply want to add an entry of your own (or edit a food within the database). That is where custom foods come into play. You can create a custom food by selecting the “New Food” button in the bottom left of the Food Log root view or by tapping the “+ Create Food” button in the bottom left of the build meal path.
This takes you to the custom food creation screen where you can name a food and enter macros, calories, micros, minerals, and serving sizes. You can also use this to quickly save food orders at restaurants as a food that is easily used in future meals – such as your Chipotle burrito order, by looking up the info on their online nutrition calculator.
Meals
Once you have your meals logged you can edit, copy, paste, delete, favorite/unfavorite, or analyze them. Tapping anywhere in the meal tile will take you to the edit meal screen. This works the same way as building the meal and allows you to make adjustments before saving them. Selecting the ellipsis menu “…” in the top right of the meal tile opens up a menu allowing you to do all of the aforementioned actions.
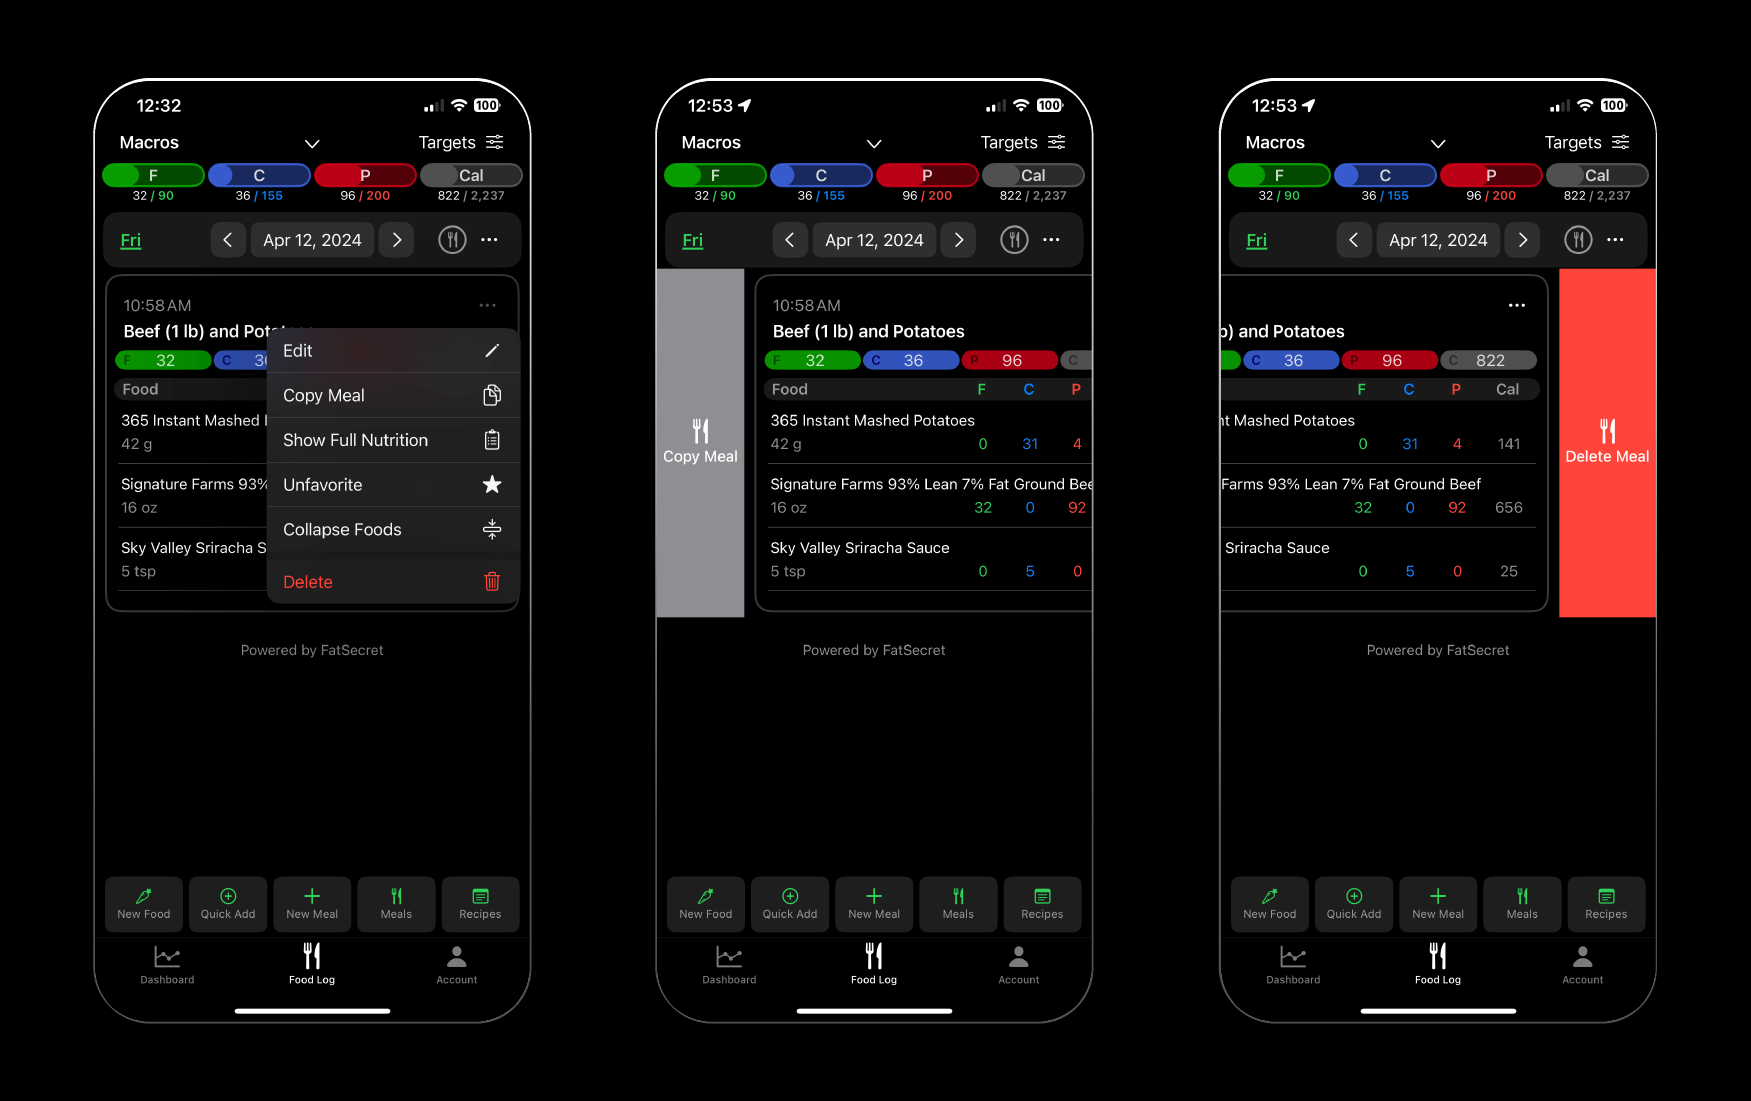
As mentioned previously, depending on the setting of the Swipe Gesture Toggle in the Date Row (“knife and fork” = meal, “carrot” = food) swiping left to right on the meal tile will copy it, and swiping right to left will delete it. If the food gesture is active (carrot) swiping left to right on a food in the meal will copy it and swiping right to left will delete it, updating the macros of the meal automatically.
Partially Logged Days
What matters most is consistency and complete logs. The only thing that can break the Macro Chief algorithm is a partially logged day, where the app thinks you ate significantly less than you actually did (logged breakfast and lunch, got busy, and forgot about dinner and the snack you had on the way home from work). The weekly check-in system has helpful reminders in case this happens, but it’s best to double-check at the end of each day that your food logs are complete.
Fasting
If you truly fast for a day (zero calories) you need to mark that day’s food log as fasted. By default, if the algorithm skips over empty food logs with no macros or calories listed in the weekly check-in calculations. To count a fasted day, mark it as fasted via the ellipsis menu “…” in the date row. This can only be done on a day with no meals logged, otherwise the option won’t appear. Doing so will show a text box stating “Fasted on this day”.
Advanced Gestures
Finally, to speed up your ability to log and help with one-handed use, there are additional gestures embedded into the food log. Pressing and holding on the left side of the screen (anywhere in the meals list section both on a meal or in the blank area) will go back a day. Doing the same on the right side of the screen will go forward a day. In addition to date movements, each of the action buttons at the bottom have a press and hold function.
- New Food (Holding): jumps to today’s date
- Quick Add (Holding): Copies all meals on observed date
- New Meal (Holding): Expands the macro view at the top
- Meals (Holding): Toggles swipe gestures
- Recipes (Holding): Opens ellipsis menu
There are numerous features packed into the food log and it can take some time to get a feel for how they work together. Begin by building meals ingredient by ingredient. For foods you find yourself returning to often, save them as favorites for easy access. Similarly, if you frequently repeat entire meals, save these as favorite meals for quick logging in the future.
Whenever necessary, create custom foods to tailor your log even further, and as you delve into creating recipes, save them in the app to streamline your meal-logging process further. By leveraging these tools, you’ll make the most of Macro Chief’s robust capabilities, turning food logging and macro tracking into a seamless part of your daily routine.